Quick Start Guide: Using Workast in Webex
Welcome to Workast in Webex. Workast is task management app for Webex teams. Workast helps teams using Webex to manage tasks, projects, daily to-dos, clients, customer requests and more.
Listed as the best project management app, Workast has helped thousands of teams manage their teamwork, increase productivity and get more work done.
This is a quick guide on how to use Workast in Webex.
Installing Workast into Webex
Apps in Webex are installed into individual spaces. Follow the instructions below to install Workast into a Webex space:
To install Workast into Webex, click on a space.
Click on Apps on the top right hand corner of the space.
Scroll down and find "Tasks by Workast" and click to install.
Enter your email address and click Get Started.
Name your space in Workast. Click Create space. Tip: It is best to name it the same as the Webex space name for easy reference.
You are all set: Click Add to tab
Workast is now installed into the space. You can now create tasks.
How to create tasks in Webex
The ability to create tasks in Webex can help assist in task management for teams, client management or project management. Each Webex space will have its own Workast space. A Workast space is where tasks live. Follow the instructions to create a task in Webex:

Install Workast into Webex following the above instructions.
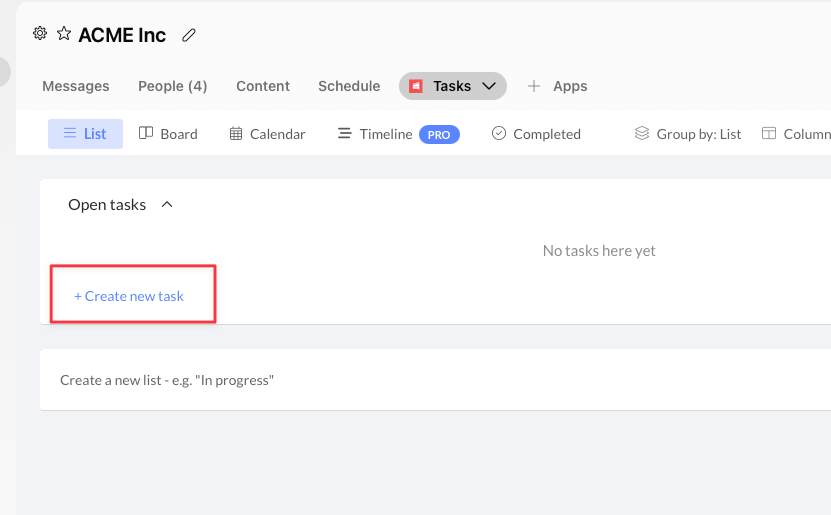
Ensure you have clicked on Tasks in top menu of the Webex space.
There will be a blue link Create new task. Click to create task.
Type the task and press enter.
To assign a task to a team member, click on the person icon and choose a person to assign the task to.
To set a due date, click on the date icon and choose a date and time.
Press enter in the task text summary to finalize the creation of the task.
How to invite users to Workast
Workast works best as a task management app for the team or department. Workast helps team members know exactly what needs to be done and when. Here is how to invite team members to Workast:
Create a task in Workast following the instructions above.
Click on the person icon which is to assign a team member to a task.
Instead of assigning the task, click on the icon of the person with a plus sign which is to Invite a team member.
Enter the team members email address and press Continue.
Add the name of the team member and choose their role. The member role is the most common role for a team member and they have access to create and manage tasks. Click Invite to continue.
Option: You can add a customized invitation message which will be sent in the invitation email.
The invitation will be sent to the team member via email.
Please note: Admins of the Webex workspace can only invite users to Workast.
How to complete a task in Webex
When you have finished the work required for the task, you can follow the instructions to complete the task in a Webex space:
Find the task you want to complete.
On the left hand side of the task, click the checkmark.
The checkmark will turn green to indicate the task has been completed.
The task will move to the Completed section shown on the top toolbar.
Frequently Asked Questions
Who can view the Workast tasks in Webex?
The participants of the Webex space will be able to view the Workast tasks.
How do I view tasks on a board?
The default view of Workast tasks is the list view. To change to the board view, simply click Board on the top toolbar (next to List). The board view is a visual way to view your tasks. It shows cards for each list. Tasks can be moved from one list to another. Here is more information about the board view.
How do I view tasks on the calendar?
The default view of Workast tasks is the list view. To change to the calendar view, simply click Calendar on the top toolbar (next to Board). The calendar is a great way to plan out the month with projects and tasks. Here is more information about the calendar in Workast.
How do I view tasks on the timeline?
The default view of Workast tasks is the list view. To change to the timeline view, simply click Timeline on the top toolbar (next to Calendar). The timeline view is a chronological way to view the tasks in the space. It shows how tasks are connected, task dependencies and the due dates of the tasks. The tasks can be moved and changed and this will update the due date of the task. Timeline is a paid feature of Workast. Here is more information about the timeline.
How do I view all completed tasks?
The default view of Workast tasks is the list view. To change to the completed view, simply click Completed on the top toolbar (next to Timeline). The completed tasks shows all the tasks completed in the space. Here is more information about the completed tasks.
How to view all tasks from all spaces?
Once you start creating multiple spaces with tasks, it can be useful to view all the tasks in all the spaces. With Workast reports, you can create customized reports which shows all the tasks across all different spaces. There are many different options of reporting within Workast to increase transparency within the team. Reports can be created so you can view all the tasks assigned to a team member, all the overdue tasks, all the completed tasks for a set period and more. Reports is a paid feature of Workast.